Monday, June 21, 2010

Missed you all!

I've been super busy, and have missed you all dearly!  I have however peeked in on all your fabulous blogs when I've had a chance.  I promise I'll post again soon, when some of my summer busyness dies down...Until then check out how well my tomatoes and peppers are doing!
This photo was taken a few weeks before I harvested these.  They really grew alot in just a couple of weeks!


I made a little anti pasta with my tomatoes.  The little orange cherry ones were the sweetest things!!

Wednesday, June 2, 2010

My Back porch Painted...check


Presenting my back porch, painted!
I've been wanting to conquer this little project since I moved into this house about nine months ago.  I just had to get up my nerve and energy.  Last weekend I decided to just go for it!

Let me take you step be step through this process, just in case you might want to try this at your house.


I started with a good porch paint


I chose to use three colors from the same color swatch; to give it some depth and hides a multitude of sins!
P.S. I have no idea why the quality of these pictures is so bad.  Could humidity have done this?  Is my camera just getting old?  I'd love some feedback.


Make sure you get the right nap for your project, since I was painting concrete I need a thicker nap.
I used this to roll my first coat.


I used this sea sponge roller to roll my net two layers/colors

Here's a picture of the next layer.  Again the picture quality is terrible, but trust me it was an improvement!


My goal was to work with these colors in the brick.


The last layer complete.


I got these chair cushions at Target; they really spruced up my old patio furniture.


I would say the best part of this project is the fact that the different paint colors, especially in the earth tones I chose, really hide dust, dirt, and leaves that might blow in.  

Hope you enjoyed your little patio tour.   Have a great day!


Woo+Hoo+Post+Button.jpg
Linking up again with Marla's WooHoo Wednesday!

Wednesday, May 26, 2010

Healthy Chocolate??

I titled my post healthy chocolate, because that's exactly what this little treat is...Healthy.  Chocolate and peanut butter goodness healthified!

I absolutely love Resees  peanut butter cups, but rarley eat them.  If your anywhere near my age let's just say pushing 40, then you can understand things like Resees become forbidden pleasures.  What do they say "a moment on the lips, a lifetime on the hips!"  Unfortunately this becomes more true with each passing year.

Which brings me to my new creation.
Vegan and high raw peanut butter cups!


these are some of the ingredients I used


and I can't forget my beloved coconut oil!


I mixed a couple of Tablespoons of PB with a little agave syrup and little ground flax to give it that Resees like consistency


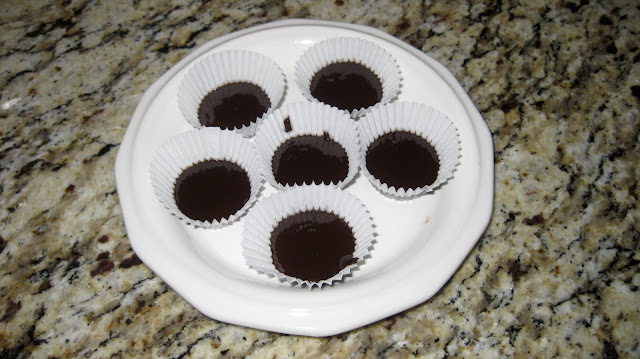
I put a little of the chocolate at the bottom of cupcake holders, which is a combo of cocoa, coconut oil, and agave syrup.  I don't measure at all; I just add a little of this and that till I like the taste and consistency.  If I were to guess I'd say I use about equal parts cocoa to coconut oil.


then I top with the PB


I finish it off with another layer of chocolate.  Refrigerate after complete.  All my candies and desserts will need refrigeration because I don't use sugar, salt, or preservatives.  All of these ingredients preserve food.


Next I whipped up a batch of Vegan and high raw chocolates.  Using the same chocolate preparation as above; cocoa, coconut oil, and agave syrup.


I finished these off by adding some mint and lemon balm from my garden


lastly I made a batch of chocolate and poured it into a dish (same preparation)
I put it in the refrigerator to harden.


then I turned it out onto a cutting board


and coarsely chopped
You can use these to bake with, snack on, use as toppings, throw in smoothies, the sky's the limit.
As everything else, keep refrigerated.  Enjoy!

Woo+Hoo+Post+Button.jpg

I'm linking up with Marla at Always Nesting

Tuesday, May 18, 2010

Shutterlove Tuesday with the Trendy Treehouse


Copy+of+4561666212_17394624b6_o.jpg
Today I'm linking up with Shutter Love Tuesday, and sharing some friendship photos!  Check them out and be sure to vote for your favorite!
My boys about 5 years ago, I love this one because they rarely have their arms around each other!


sometimes enough is enough!
(my entry)


my sweet little boy


me and my best friend


my sister and I having a girls weekend


one of my best friends since high school

Also a deal for all the mommy bloggers out there, this Saturday 5/22 Old Navy has $1.00 FLIP FLOPS!
Get there early and stock up!
product.do.jpg

Monday, May 17, 2010

Vegan and raw chick'n salad cabbage wraps

I'm always experimenting with new ways of preparing food...trying to come up with healthier, quicker, more delicious, and more budget friendly ways of making familiar and unfamiliar dishes.    Recently I stumbled across a blog, Love Veggies and Yoga,  that really inspired me to try all kinds of new recipes and techniques in the kitchen.  Avery is a genius with healthy desserts.  She prepares most all of her food Vegan and raw due to food allergies and sensitivities, and an overall concern about optimal health.  I wanted to share this little creation I came up with recently, inspired by Avery.

to make these I started with raw almonds between 3/4 and 1 cup

Then I ground them using my magic bullet.  You could use a blender, food processor, whatever you have that will finely grind them.

Have you tried this dressing?  It is hands down the best ginger dressing I've ever had outside of a restaurant.

I poured this dressing all over my almond meal.  I used a third to half of a cup.

then I chopped veggies; cabbage, green onions, carrots, and celery

I mixed the veggies and almond meal with the dressing

I pulled a few cabbage leaves off the head

and viola! Vegan and raw chick'n salad cabbage wraps.
These were so delicious and filling!